GameBoy Color inside a TI-83 series calculator
Back in high school, I decided to take the guts of an old GameBoy Color and stuff them into a broken TI-83 calculator, mapping the actual calculator keys to the GameBoy buttons. It was a messy hack, but it worked. My efforts were featured on several online news sites:
Make Magazine - "Gameboy gets implanted inside a TI-83 series calculator"
Gizmodo - "Gameboy Color Inside a TI-83 Series Calculator"
Kotaku - "Game Boy Calculator Earns A Perfect 10 From The Nerd Judges"
Hack a Day - "GameBoy color in a TI-83"
TechCrunch - "Hide a Gameboy inside a Ti-83 calculator"
January 15, 2007
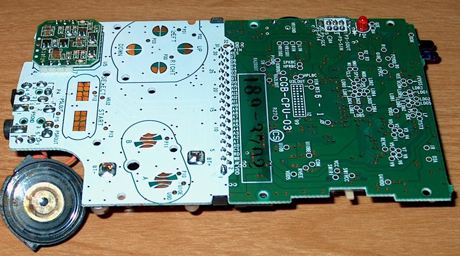
Front of the GBC motherboard

Back of the GBC motherboard

Verifying that the GBC still boots

Size comparison of my TI-84 next to the GBC innards. I did not use the TI-84, but rather a broken TI-83 I got from a friend.

Reverse side of the TI-84 next to the GBC innards.

Directional pad control pins, determined by trial-and-error.
These pins are "active low" meaning they are activated by grounding them.

A/B control pins

Select/start control pins

Keypad contact board from a broken TI-83, wired out to the GameBoy motherboard.
2nd → A
ALPHA → B
arrow keys → DPAD
enter → start
+ key → select

All hooked together. Somehow, it worked.

GBC board on top of the TI-83 innards.

Heavily modified back piece

All put together! Pokemon is visible on the screen. Notice the clear button is upside down...

Another shot of the game running.

Back of the case, revealing the game cartridge. The plastic back panel conceals this mess.